

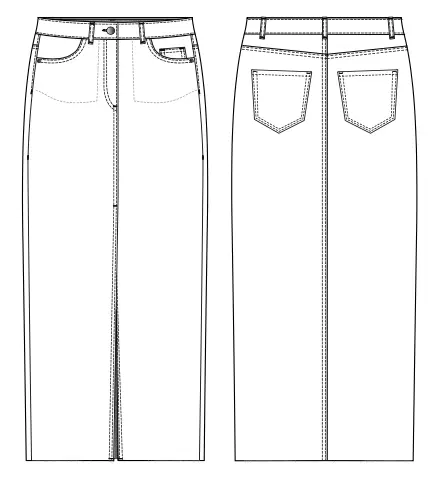
The skirt is maxi length and slightly tapered at the bottom featuring a stitched waistband, a metal zipper, pockets in the side seams and one watch pocket, a cut in the middle seam. The back has detachable yokes and patch pockets. The bottom of the skirt is not hemmed.
We recommend using denim.
• Metal zipper — 16 cm (6 ¼”);
• Interfacing — 15 cm (5 ⅞”);
• Button — 1 pc.;
• Cotton lining — 25 cm (9 ⅞”);
• Bias cut fusible tape — 30 cm (11 ⅞”).
|
International Size \ European size |
XXS-XS / 34-36 |
S-M / 38-40 |
L-XL / 42-44 |
2XL-3XL / 46-48 |
|---|---|---|---|---|
| Main fabric, m | 1,10 | 1,20 | 1,25 | 1,30 |
| Main fabric, yd | 1 ¼ | 1 ⅜ | 1 ⅜ | 1 ⅜ |
When purchasing fabric, please account for shrinkage and buy 5—10% more than required.
Pattern pieces already include 1 cm (3/8”) seam allowances. Adjust the length of the skirt according to your height.
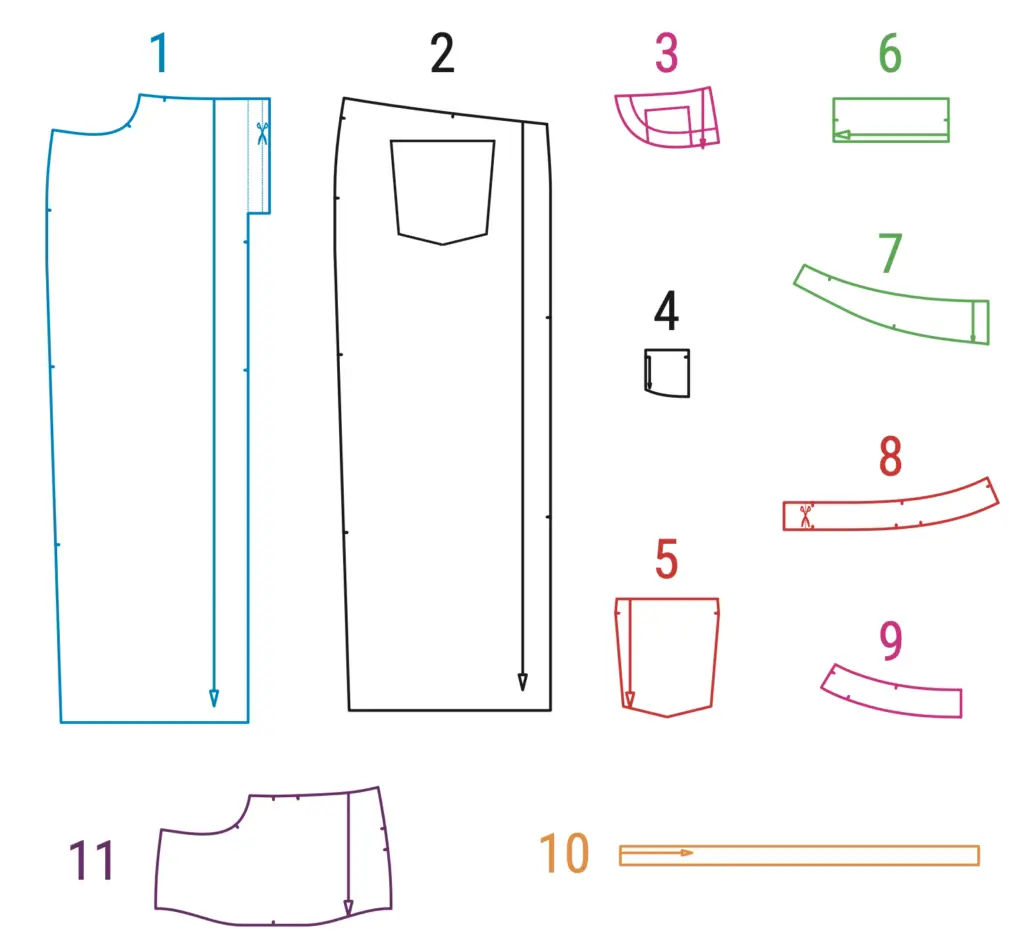
(№ – Name – Pieces’ quantity)
Main fabric:
1 – Front skirt – 2
2 – Back skirt – 2
3 – Side – 2
4 – Watch pocket – 1 Right side
5 – Patch pocket – 2
6 – Fly – 1 + Interfacing
7 – Back yoke – 2
8 – Front waistband – 4 + Interfacing
9 – Back waistband with a fold – 2 + Interfacing
10 – Loop – 1
Lining fabric
11 – Pocket bag – 2
• Waist ease — 3 cm (1 ⅛”);
• Hips ease — 0.5 cm (3/16″).
Fly (6), front waistband (8), back waistband (9). Strengthen the pocket entrance with bias cut fusible tape on the pocket bag (11), interface the allowances for the zipper on front pieces (1).
Width of fabric — 1.50 m (1 ⅝ yd)
Size — 34 (XXS)

Size — 48 (XXXL)

POCKETS ON THE FRONT
1. Press the top allowance of the watch pocket (4). Sew along the edge of the seam allowance. Press.
2. Press the side allowances of the watch pocket by 1 cm (3/8”).
3. Sew the pocket on the left side (3) according to the markings on the patterns. Press.
4. Overlock the bottom edges of the sides.
5. Interface the pocket bag (11) with bias cut fusible tape.
6. Sew the sides along all the edges onto the top right side of the lining.
7. Stitch the pocket entrance on the front of the skirt (1) with pocket lining at 0.7 cm (1/4’’), folding the pieces right sides together. Notch seam allowances and flip onto the right side. Press.
8. Make two top stitches at the entrance to the pocket at 0.2 cm (1/16’’) and 0.5 cm (3/16’’). Press.
9. Overcast the lining with a double fold hem seam, fold it inside out and stitch at 0.5 cm (3/16’’). Fold the lining over and stitch so that the seam allowance is on the inside. Press.
10. Stitch the front with sides and lining along the side and top edges.
ZIPPER
1. Overlock the middle sections of the front pieces of the skirt until the cut is notched. Press the fly allowances along the notches.
2. Sew the middle seam from the fly to the cut. Press the allowances.
3. Sew the cut with a double folded hem. To do this, press the seam allowances at 0.5 cm (3/16’’) and again at 0.5 cm (3/16’’), stitch and press.
4. You can make a zigzag stitch at the base of the cut.
5. Press the fly catch (6) in half and overlock the side and bottom edges.
6. To the hemmed edge of the fly, stitch the zipper close to the chain, ending the stitching near the zipper stop.
7. Place the pressed front left piece of the skirt over the zipper, pin and stitch close to the zipper along the pressed fold.
8. Place the fly (the right side of the fastener) evenly on the zipper, then bend half of the skirt and pin the fly onto the zipper. Stitch close to the zipper chain.
9. Make two topstitches along the front side of the fly, as well as a topstitch along the pressed edge.
10. Zigzag stitch to secure the ends of these stitches.
11. Sew the fly with the fly catch at the bottom from the wrong side. Press the finished fastener.
SKIRT BACK PIECES
1. Sew the back yokes (7) to the top edge of the back of the skirt (2), folding the parts right sides together. Overlock and press the yoke allowances.
2. Make a double topstitch along the yokes and press.
3. Place the back pieces with right sides facing each other and sew the middle seam, overlock the cut and press. Make a double topstitch along the middle seam.
4. Press the top allowance of the patch pockets (5) by 1 cm (3/8”) and 2 cm (3/4”), and overlock the allowances. Cut out corners and flip it right side out.
5. Make a topstitch along the edge of the allowance.
6. Press the bottom and side seams.
7. Mark the location of the pockets according to the markings on the patterns and sew them with a double topstitch. Press.
ASSEMBLING
1. Place the front and back right sides together and sew side seams. Overlock and press seam allowances to the back.
2. Topstitch along the side allowance of the back of the skirt at 0.2 cm (1/16’’) from the waist cut to the place where the pocket ends, and secure it with a zigzag stitch.
WAISTBAND AND LOOPS
1. Sew the front (8) and back (9) waistbands along the side seams. Press the allowances.
2. Overlock one edge of the waistband loop (10). Place the second edge towards the center
of the piece and cover with an hemmed seam allowance. Pin along the entire length and topstitch at 0.2 cm (1/16’’) along the folds. Press.
3. Cut the loops to the required length and sew them to the waistline of the skirt along the notches.
4. Press the top waistband along the bottom edge.
5. Sew the waistbands along the side and top edges. Cut out corners, flip onto the right side and press.
6. Sew the unpressed belt to the top edge of the skirt, placing it with the right side to the wrong side of the skirt. Press the seam allowances onto the waistband.
7. Topstitch along all sides of the waistband, securing the bottom waistband at the same time.
8. Sew the belt loops to the waistband and press.
9. Make zigzag stitch on the belt loops, on the back pockets, and at the bottom of the side seams.
10. Make a buttonhole and sew on a button.
11. Give the skirt a final press.