

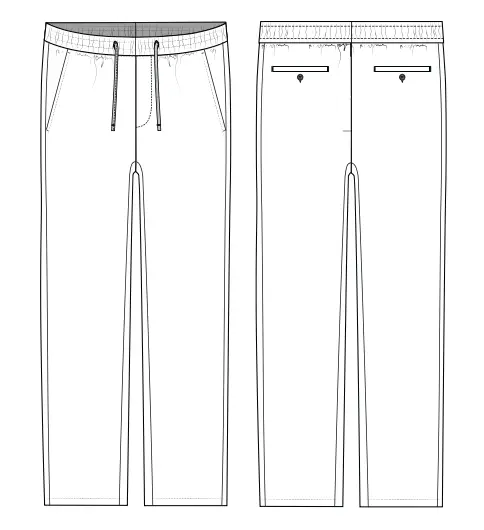
Straight-cut trousers feature an elasticated waistband, grommets and drawstring. There is a fly imitation on the front. There are pockets in the side seams and welt pockets on the back.
Natural fabrics are well suited for sewing: cotton, linen.
• Cord — 1.70 m (1 ⅞ yd);
• Interfacing tape — 50 cm (19 ⅝”);
• Interfacing — 10 cm (4″);
• Grommets — 2 pcs.;
• Buttons — 2 pcs;
• Elastic band 3,5–4 cm (1 ⅝”) wide, the length per sizes (cm/in):
| Sizes | 46 | 48 | 50 | 52 | 54 | 56 | 58 | 60 |
|---|---|---|---|---|---|---|---|---|
| cm | 74 | 77 | 81 | 85 | 88 | 92 | 96 | 100 |
| in | 29 ⅛ | 30 ¼ | 31 ⅞ | 33 ½ | 34 ⅝ | 36 ¼ | 37 ¾ | 39 ⅜ |
|
International Size \ European size |
S-M / 46-48 |
L-XL / 50-52 |
2XL-3XL / 54-56 |
4XL-5XL / 58-60 |
|---|---|---|---|---|
| Main fabric, m | 1,60 | 1,70 | 1,80 | 1,85 |
| Main fabric, yd | 1 ¾ | 1 ⅞ | 2 | 2 |
When purchasing fabric, please account for shrinkage and buy 5—10% more than required.
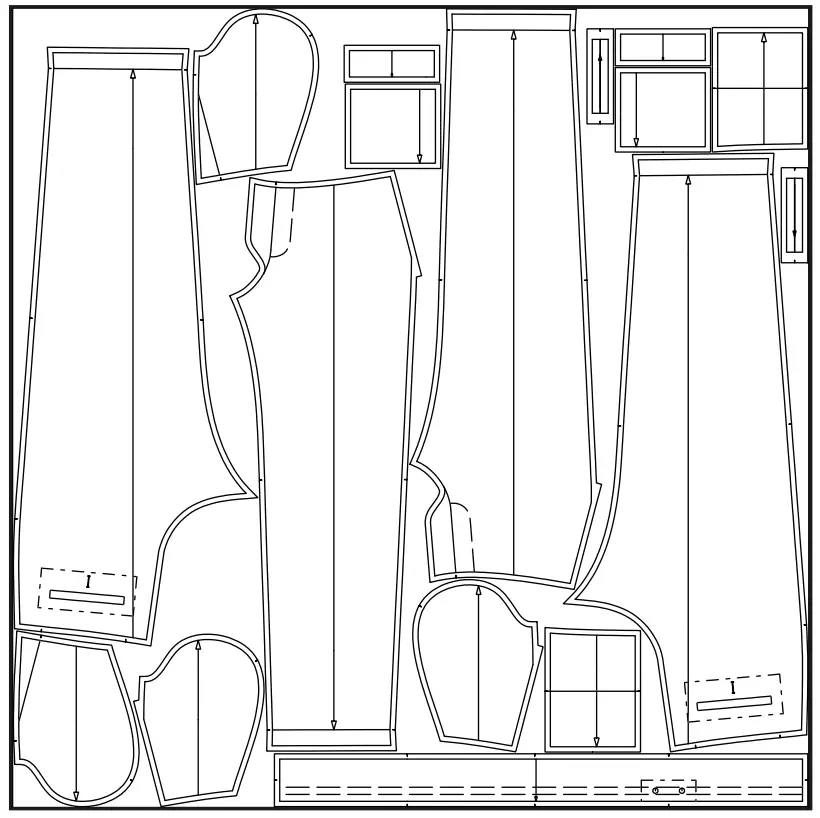
Pattern pieces already include seam allowances.
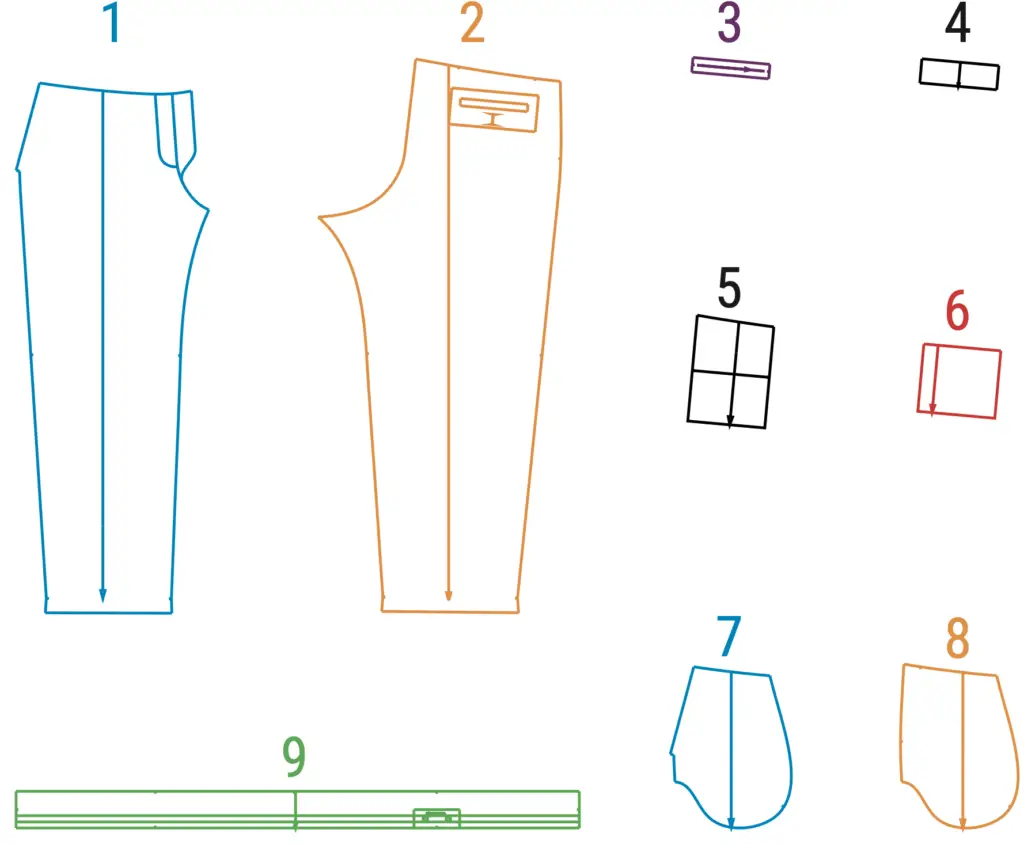
(№ – Name – Pieces’ quantity)
Main fabric:
1 – Front trouser – 2
2 – Back trouser- 2
3 – Welt – 2 + Interfacing
4 – Pocket facing – 2
5 – Big pocket bag – 2
6 – Small pocket bag – 2
7 – Pocket bag of the front pocket – 2
8 – Side – 2
9 – Waistband – 1
• Waist ease — 15 cm (5 ⅞”);
• Hips ease — 7 cm (2 ¼”);
• Thigh ease — 13.5 cm (5 ½”).
Welt (3).
Interface the entrance to the pocket on the front with interfacing tape(1), as well as area for the grommets on the waistband (9). Interface the pocket entrance on the back pieces (2).
Size — 46 (S)
Size — 60 (5XL)

WELT POCKETS
1. Mark out the location of the welt pockets on the right side of the back pieces (2).
2. Press the welt piece (3) in half.
3. Press one long section on the pocket facing (4) to the wrong side by 1 cm (3/8’’).
4. Mark allowances and stitching lines on the welt and the pocket facing according to the pattern.
5. Apply the pocket facing piece to the upper chalk line on the back pieces with the pressed edge up, and apply the welt to the lower chalk line with the fold down. Sew them with two parallel stitches.
6. Mark allowances and a stitching line on the long section of the small pocket bag piece (6) on the wrong side according to the pattern. Place right sides together and stitch the small pocket bag piece right into the welt stitching line.
7. Cut the entrance to the pocket between the made stitches, not reaching the edge of 1 cm (3/8’’), then cut into the corners, not reaching 0.1 cm (1/16’’) from the stitching lines. Turn the welt and pocket facing piece inside out.
8. Place a large pocket bag (5) with the right side inside of the trousers on the pocket, aligning the notches, and sew along the waist cut, stepping 0.5 cm (3/16’’) from the pocket bag edges.
9. Pin the pocket bag to the trousers, stepping 5 cm (2’’) from the top. Bend the pocket bag, align it with the pressed edge of the pocket facing and stitch it.
10. Remove the pins and secure the ends of the welt all the way through.
11. Overlock the seam allowances on the wrong side of the pocket.
12. Topstitch along the bottom seam of the welt along the trouser part below the sewing line of the welt by 0.1 cm (1/16’’) so that the entrance to the pocket remains free, capturing only the small pocket bag.
13. Stitch and overlock the pocket bag. Press.
14. Topstitch along the top and sides of the pocket through 0.1 cm (1/16’’) from the seam.
SIDE SEAM POCKETS
15. Reinforce the entrance to the pocket on the front (1) with interfacing tape.
16. Place the pocket bag (7) right sides together with the cut of the pocket entrance. Stitch and fold inside out. Press.
17. Make two parallel top stitches along the pocket entrance line at 0.1 (1/16’’) cm and 0.5 cm (3/16’’) from the edge.
18. Sew the cut-off side piece(8) to the pocket bag, placing the pieces right sides together. Overlock and press.
19. Attach the pocket to the front along the side and top edges.
TROUSERS ASSEMBLING
20. Stitch and overlock the trousers along the side and leg seams, placing the pieces right sides together. Press seam allowances towards the back pieces.
21. Sew the seat seam, overlock, placing the trouser legs right sides together. Press seam allowances towards the left leg.
22. Mark the topstitching lines on the pattern, simulating a fly, and make them using the sewing machine.
WAISTBAND
23. Install grommets on the waistband parts (9).
24. Fold the waistband with the right side inward and stitch along the side seam. Press allowances.
25. Press the waistband in half along its entire length.
26. Cut the elastic band to the desired length and stitch it into a ring.
27. Place the elastic into the waistband and secure with a stitch along the bottom edge. To connect the elastic band and the waistband evenly, divide the elastic band and the waistband into 4 equal parts and connect them.
28. Topstitch along the waistband. These stitches help to form a drawstring for the cord.
29. Sew the waistband to the top edge of the trousers, placing the waistband right sides together with the trousers. Overlock seam allowances and press towards the trousers.
30. 3Cut the cord to the required length and insert it into the drawstring of the waistband using a pin. Cover the ends of the cord with decorative tips or any other way.
31. Finish the bottom of the trousers with a closed hem seam. To do this, press seam allowances of 1 cm (3/8’’) and 3 cm (1 1/8’’) and topstitch. Press.
32. Backstitch or handstitch along the pocket entrance line at the beginning and end.
33. If desired, sew buttonholes on the back pieces. Attention! Make a buttonhole along the back and top of the pocket bag, not through. Sew buttons onto the pocket facing.
34. Give the trousers a final press.