

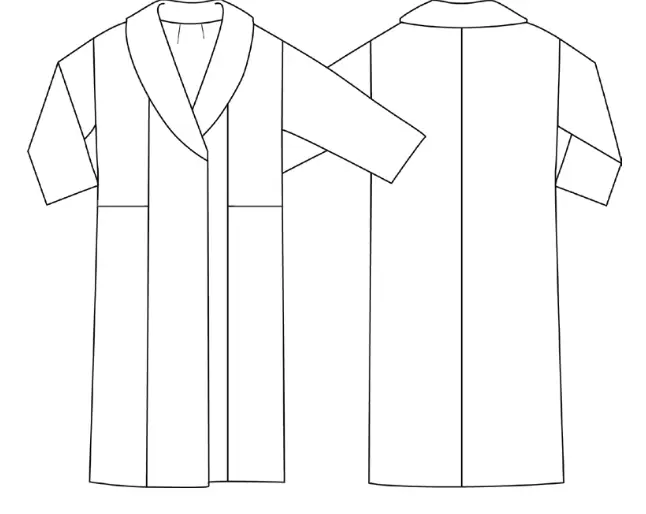
Look sophisticated in this fashionable faux fur coat. With its straight silhouette, concealed button fastening, dropped shoulder line, and shawl collar, it’s sure to turn heads. The pockets in the side panels of the front of the coat provide added convenience. Plus, the coat is luxuriously lined for a polished look. Embrace the style with this stunning piece.
Long or short pile faux fur, faux sheepskin.
• Interfacing — 1,20 m (1,3 yd);
• Metal snap buttons — 6 pieces;
• Lining fabric — 1,90 m (2 yd).
|
International Size \ European size |
XXS-XS / 34-36 |
S-M / 38-40 |
L-XL / 42-44 |
2XL-3XL / 46-48 |
|---|---|---|---|---|
| Main fabric, m | 2,65 | 2,80 | 2,90 | 3,00 |
| Main fabric, yd | 2 ⅞ | 3 | 3 ⅛ | 3 ¼ |
When purchasing fabric, please account for shrinkage and buy 5—10% more than required.
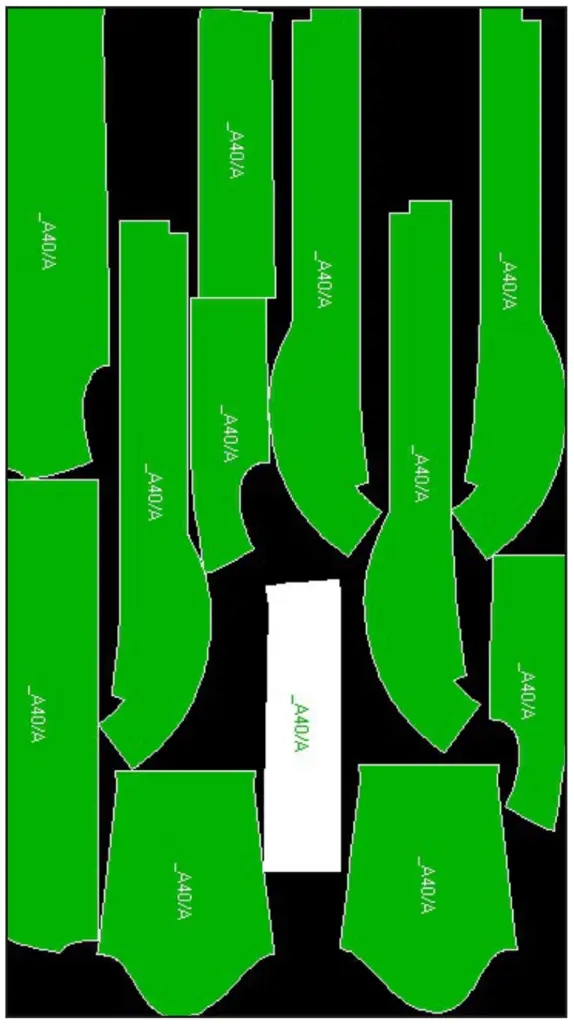
Pattern pieces already include 1 cm (⅜”) seam allowance for all edges.
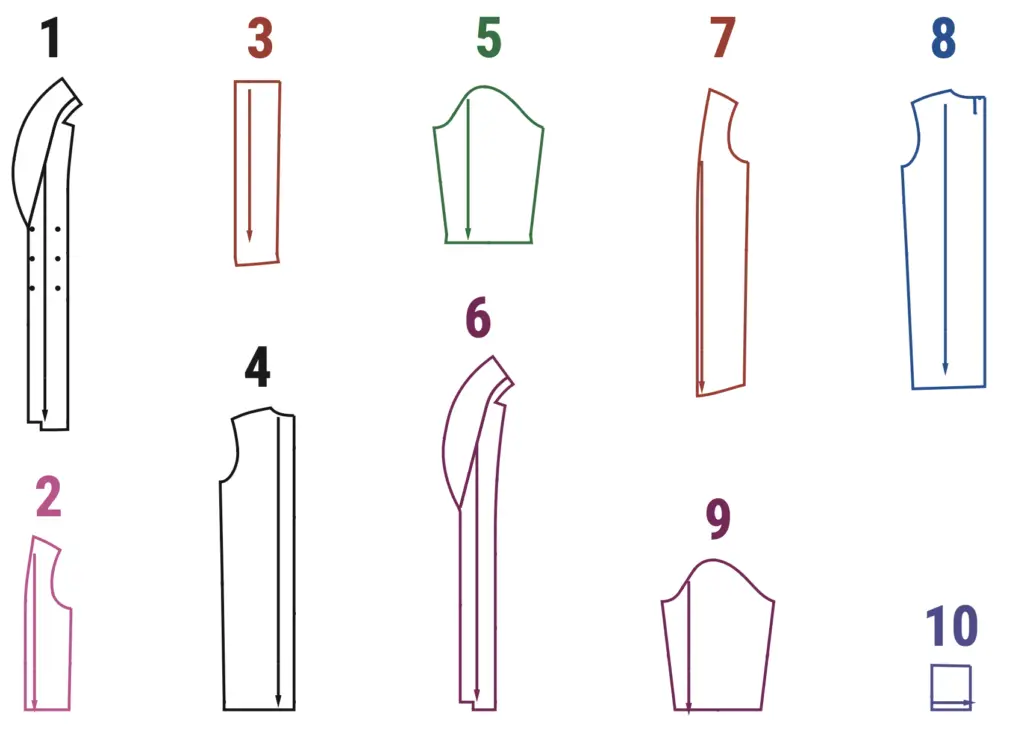
(№ – Name – Pieces’ quantity)
Main fabric:
1 – Central front – 2
2 – Side front – 2
3 – Lower front / Bottom front part – 2
4 – Back – 2
5 – Sleeve – 2
6 – Front facing – 2 + Interfacing
Lining fabric:
7 – Front lining – 2
8 – Folded back lining – 1
9 – Sleeve lining – 2
10 – Pocket lining – 2
We have included generous ease allowance to our pattern to make sure it’s both comfortable and allows for free movement. This extra space around the edges of the garment makes sure that you’ll feel great in it, no matter what you’re doing.
• Chest ease: 30 cm (11 ⅞);
• Waistline ease: 46 cm (18 ⅛);
• Hipline ease: 20 cm (7⅞);
• Shoulder ease: 18 cm (7 ⅛).
We recommend pre-washing your fabric to protext against shrinkage.
If using, add iron-on interfacing to the wrong side of the Front facing (6).
Width of fabric — 1.50 m (1 ⅝ yd)
Size — 34 (XXS)
Size — 48 (XXXL)
POCKETS
1. Glue and press the pocket hem onto the lower front piece (3) as marked
2. Attach the pocket lining (10) with a 1 cm (3/8”) seam allowance. Press the allowance downward.
3. Line up the Bottom front part (3) with the Front side part (2) right sides facing and pin in place. Fold it upwards and stitch the lining along the bottom edge with the side part.
4. Secure the pocket along the side edge and the relief edge. Press it in place.
BODY
1. Place the front side part onto the central front part (1), align the notches, pin, and stitch with a 1 cm (3/8”) seam allowance. Press seam allowances open.
2. Fold the back pieces (4) with the right sides together, aligning the central edge notches, pin, and sew with a 1 cm (3/8”) seam allowance. Press seam allowances open.
3. Sew the front pieces together along the collar edge. Press the seam allowances open.
4. Fold the front and back pieces with right sides together, align the side edges, and pin at the notches. Sew with a 1 cm (3/8”) seam allowance. Press seam allowances open.
5. Glue the back shoulder seam. Place the front and back shoulder seams with right sides together, aligning all points and notches, and sew with a 1 cm (3/8”) seam allowance, including the neckline. Press seam allowances open.
6. Fold the facing pieces (6) with right sides together and sew along the central collar edge with a 1 cm (3/8”) seam allowance. Press seam allowances open.
7. Place the facing onto the garment right sides together, match the notches, pin and edge‑stitch with a 0,7 cm (1/4”) seam allowance. Press and Iron the sides without edges.
SLEEVES
1. Press the sleeve (5) hem allowance along the notches.
2. Fold the sleeve pieces right sides together, match the notches, pin, and stitch. Press the seam allowances open.
3. Insert the sleeve into the armhole, right sides facing each other, pin at the notches, and sew with a 1 cm (3/8”) seam allowance. Press and iron the sleeve cap seam without touching the insertion seam with the iron.
LINING
1. Fold the lining sleeves (9) with the right side inwards, aligning the notches, pin, and stitch with a 1 cm (3/8”) seam allowance. Leave a technical hole in the left sleeve, and iron the seam allowances towards the back half of the sleeve.
2. On the lining back (8), sew a pleat, then spread it out in both directions and secure it.
3. Place the lining front (7) face to face with the lining back (8), pin along the side edges, and stitch with a 1 cm seam allowance. Iron the seam allowances toward the back.
4. Stitch the shoulder seams up to the notches, stopping 1 cm before the edge of the waistband. Iron the seam allowances toward the back.
5. Insert the lining sleeves into the armholes with a 1 cm (3/8”) seam allowance.
6. Attach the holders from the lining at the shoulder seam area and under the armhole.
7. Lay the lining face to face with the coat and pin along the edge of the waistband and collar, aligning the notches and seams. Stitch with a 1 cm (3/8”) seam allowance along the edge of the waistband, then turn it around and stitch the shoulder seams, transitioning to the neckline.
8. Secure the collar seams, secure the lining to the garment along the neckline and shoulder seams. Attach the holders to the garment.
9. Edge stitch the lining to the bottom of the sleeve, aligning the seams and notches. Secure it along the seam.
10. Attach the lining to the bottom of the garment with a 1 cm (3/8”) seam allowance, aligning all the seams. Secure the hem along all seams.
11. Turn the coat inside out and sew up the technical hole.
12. Attach the buttons according to the markings on the patterns.
13. Give the garment a final press.