

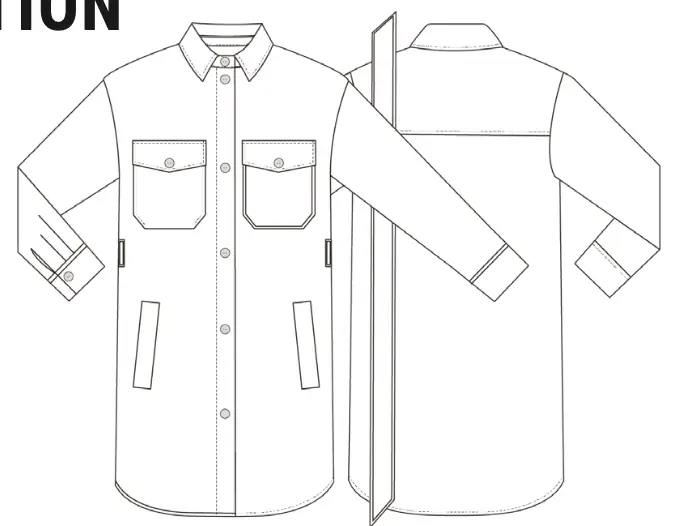
Shacket of a straight cut with a central fastener with buttonholes and buttons and a removable belt. There are patch pockets and flaps on the front in the chest area. There are welt pockets in the lower part. The shacket features a turn-down collar, long sleeves with cuffs, back with yoke.
Coat fabrics of medium density.
• Interfacing — 40 cm (15 ¾”);
• Lining — 75 cm (29 ½”);
• Buttons — 10 pcs.
|
International Size \ European size |
XXS-XS / 34-36 |
S-M / 38-40 |
L-XL / 42-44 |
2XL-3XL / 46-48 |
|---|---|---|---|---|
| Main fabric, m | 1,90 | 2,00 | 2,05 | 2,10 |
| Main fabric, yd | 2 ⅛ | 2 ¼ | 2 ¼ | 2 ¼ |
When purchasing fabric, please account for shrinkage and buy 5—10% more than required.
Pattern pieces already include 1 cm (⅜”) seam allowances for joining seams and 0.7 cm (¼”) seam allowances for overlocking seams.
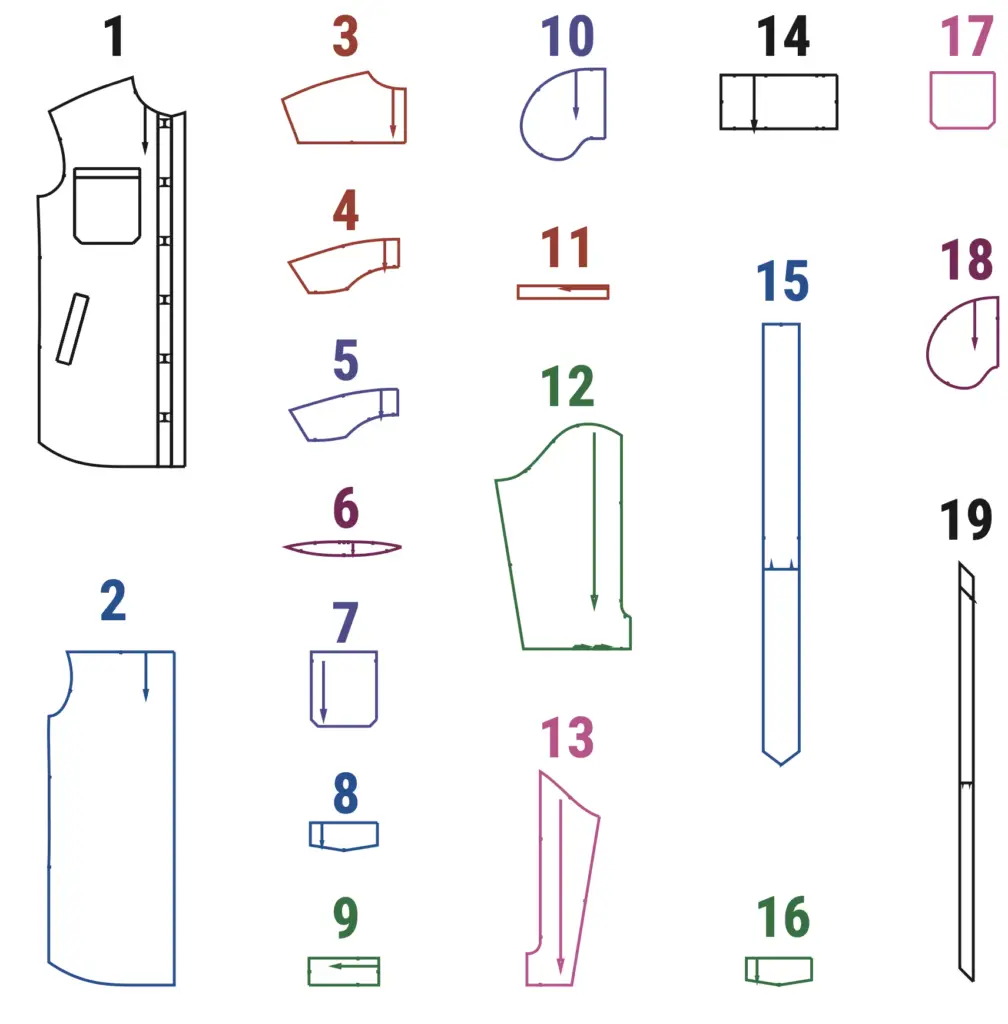
(№ – Name – Pieces’ quantity)
Main fabric:
1 – Front – 2
2 – Folded back – 1
3 – Folded yoke – 1
4 – Folded top collar – 1 + Interfacing
5 – Folded under collar – 1
6 – Stand – 2 + Interfacing
7 – Flap pocket – 2
8 – Flap – 2 + Interfacing
9 – Welt – 2 + Interfacing
10 – Pocket facing – 2
11 – Belt loop – 1
12 – Sleeve front – 2
13 – Sleeve back – 2
14 – Cuff – 2 + Interfacing
15 – Belt – 2 + Interfacing
Lining
16 – Folded yoke – 1
17 – Flap facing – 2 + Interfacing
18 – Top pocket lining – 2
19 – Under pocket facing – 2
20 – Edging tape – 2
• Chest ease — 32 cm (12 ⅝”);
• Waistline ease — 49 cm (19 ¼”);
• Hipline ease — 23 cm (9″);
• Shoulder ease — 16 cm (6 ¼”).
Top collar (4), stand (6), flap (8), welt (9), cuff (14), belt (15), flap facing (16).
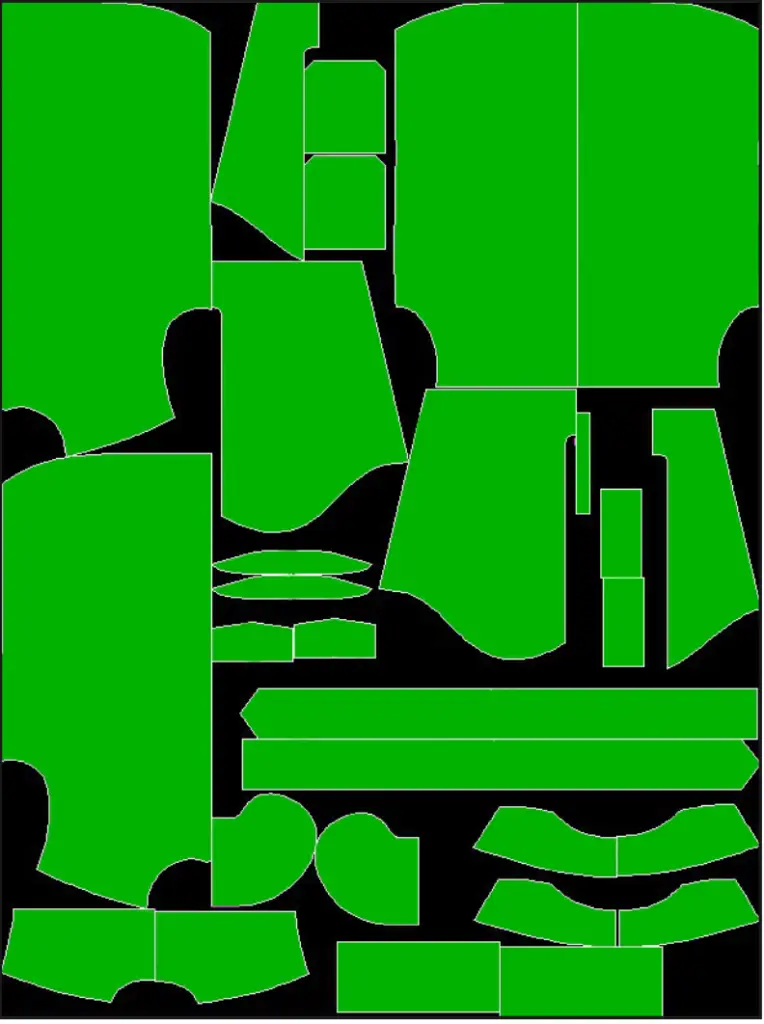
Width of fabric — 1.50 m (1 ⅝ yd)
Size — 34 (XXS)

Size — 48 (XXXL)
WELT POCKETS
1. Transfer the location of the pockets to the front parts (1).
2. Fold welts (9) in half wrong sides inward and press them.
3. Stitch the bottom pocket lining (18).
4. Mark a 1 cm (3/8’’) seam line on the pocket facing (10).
5. Pin the welt with the stitched pocket bag to the bottom line of the pocket frame, pocket bag faces up. Place the welt on the top line and pin, aligning the lines and the end of the pocket marking. Sew a welt and a pocket facing onto the front pieces. After stitching, check the distance between the seams. It should be strictly equal to the width of the finished welt.
6. Next, cut the entrance to the pocket in the center between the lines, not reaching the horizontal line by 2 cm (3/4’’); cut the corners, not reaching 1 mm (3/64’’) to the line.
7. Turn the welt and pocket facing onto the wrong side of the front, straighten the corners and secure them.
8. Stitch the pocket bag. Overlock or zigzag the pocket bag and the seam allowance of the welt. Press.
FLAP POCKETS
1. Sew the lining (17) to the patch pocket allowance (7), leaving a 3 cm (1 1/8’’) unstitched opening for turning. Press the seam allowance.
2. Go around the pocket, placing the lining right sides together with the pocket, and sew at 0.5 cm (3/16’’) from the edge. Cut the corners, turn them inside out and press. Topstitch along the hem of the pocket.
3. Overlock or zigzag the flap (8) with the flap facing (16) at 0.5 cm (3/16’’) from the edge. Trim the corners and turn them onto the right side. Press, overlock or zigzag the seam allowance and topstitch along three sides of the flap at 0.5 cm (3/16’’) from the edge. Sew the buttonholes.
4. Place the pockets on the markings and topstitch at 0.5 cm (3/16’’) from the edge.
5. Stitch the flap, bend it over and topstitch at 0.5 cm (3/16’’) from the stitching seam. Press.
BACK
1. Place the back (2) between the yokes (3) made of the main fabric and the lining, matching the cuts and notches. Sew and turn the seam allowance up. Topstitch at 0.7 cm (1/4’’) from the stitching seam. Press.
2. Align the front (1) with the top yoke right sides together along the shoulder cuts. Place the bottom yoke on the top the right side down, align the shoulder cuts and pin. Stitch the shoulder cuts. Turn the garment right side out and press it.
3. Overlock or zigzag the side cuts of the front and back, pin and stitch. Press the seam allowance.
SLEEVE
1. Interface and overlock or zigzag the seam allowance on the sleeves (12) and (13).
2. Press the vent on the elbow part of the sleeve (13), and topstitch at 0.5 cm (3/16’’) along the vent.
3. Fold the sleeve front (12) and elbow (13) pieces right sides inside and stitch along the elbow seam at 1 cm (3/8’’) together with the vent.
4. Overlock or zigzag the seam allowance and press towards the front of the sleeve. Topstitch along the elbow seam at 0.5 cm (3/16’’) and the same along the vent.
5. Make folds.
6. Sew the front seam of the sleeve at 1 cm (3/8’’), overlock or zigzag the seam allowance and press to the front.
7. Press the cuffs (14) in half. Press one cut at 1 cm (3/8’’).
8. Sew the edges at 0.7 cm (1/4’’), trim and turn out the corners. Press.
9. Place the cuffs with an open seam allowance to the wrong side of the sleeve and sew in. Press the seam to the cuff side.
10. Close the seam with the pressed cuff allowance and stitch at 0.2 cm (1/16’’). Press the cuffs.
COLLAR
1. Sew stand collars (6) to the top (4) and under (5) collar. Press the seam allowances and topstitch at 0.2 cm (1/16’’) from the seam on both sides of the seam.
2. Place the collars right sides down and sew at 0.7 cm (1/4’’), trim the corners and turn them onto the right side. Press the collar and topstitch at 0.5 cm (3/16’’) from the seam. Secure the stands and secure the cut.
3. Pin the collar into the neck along the notches, stitch it around with a placket at 1 cm (3/8’’). Edge the sewing seam, press it down and secure the seam allowance.
GARMENT ASSEMBLING
1. Edge the bottom of the garment with the edging tape (19), press the seam allowance at 1 cm (3/8’’) and topstitch at 0.2 cm (1/16’’) from the edge of the edging tape. Press the bottom.
2. Place the sleeve into the armhole right side together with the garment, pin along the notches and sew in. Press the fit along the sleeve edge, not going beyond the stitching line with the iron, and overlock it. Direct the allowance onto the garment.
3. Overlock or zigzag one cut of the belt loop (11).
4. Place the unsewn edge towards the center of the piece and cover it with the overlocked seam allowance. Pin along the entire length and topstitch at 0.2 cm (1/16’’) on the folds. Press.
5. Cut the belt loops to the desired length and stitch them to the waist line.
6. Fold the belt (15) right sides inside and sew at 0.7 cm (1/4’’) from the edge, leaving an unstitched opening for turning. Turn it right side out, press it and topstitch at 0.5 cm (3/16’’) along the belt.
7. Sew the buttonholes on the cuffs and the placket. Sew the buttons.
8. Give the shacket a final press.