

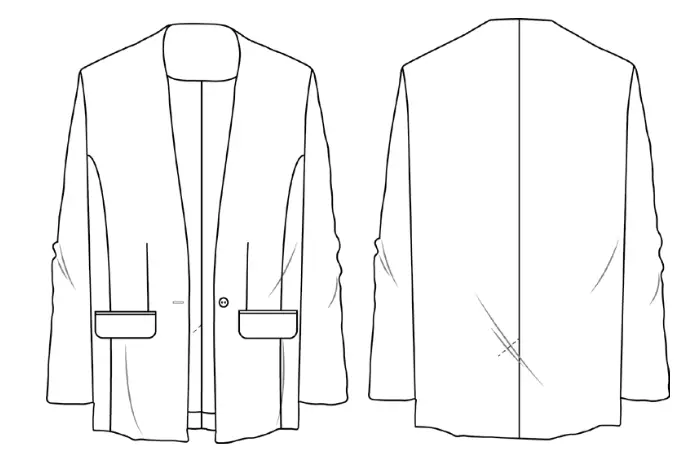
Jacket of a straight cut, lined with one button fastening. It features framed welt pockets with flaps along the front and a vent in the central seam of the back.
We recommend medium-weight suiting fabrics.
• Fusible tape — 1.50 m (1 ⅝ yd);
• Interfacing — 1.10 m (1 ¼ yd);
• Lining — 1.55 m (1 ¾”);
• Button — 1 pc;
• Shoulder pads — 2 pcs;
• Sleeve head rolls — 2 pcs.
|
International Size \ European size |
XXS-XS / 34-36 |
S-M / 38-40 |
L-XL / 42-44 |
2XL-3XL / 46-48 |
|---|---|---|---|---|
| Main fabric, m | 1,50 | 1,60 | 1,70 | 1,75 |
| Main fabric, yd | 1 ⅝ | 1 ¾ | 1 ⅞ | 1 ⅞ |
When purchasing fabric, please account for shrinkage and buy 5—10% more than required.
Pattern pieces already include 1 cm (3/8”) seam allowances.
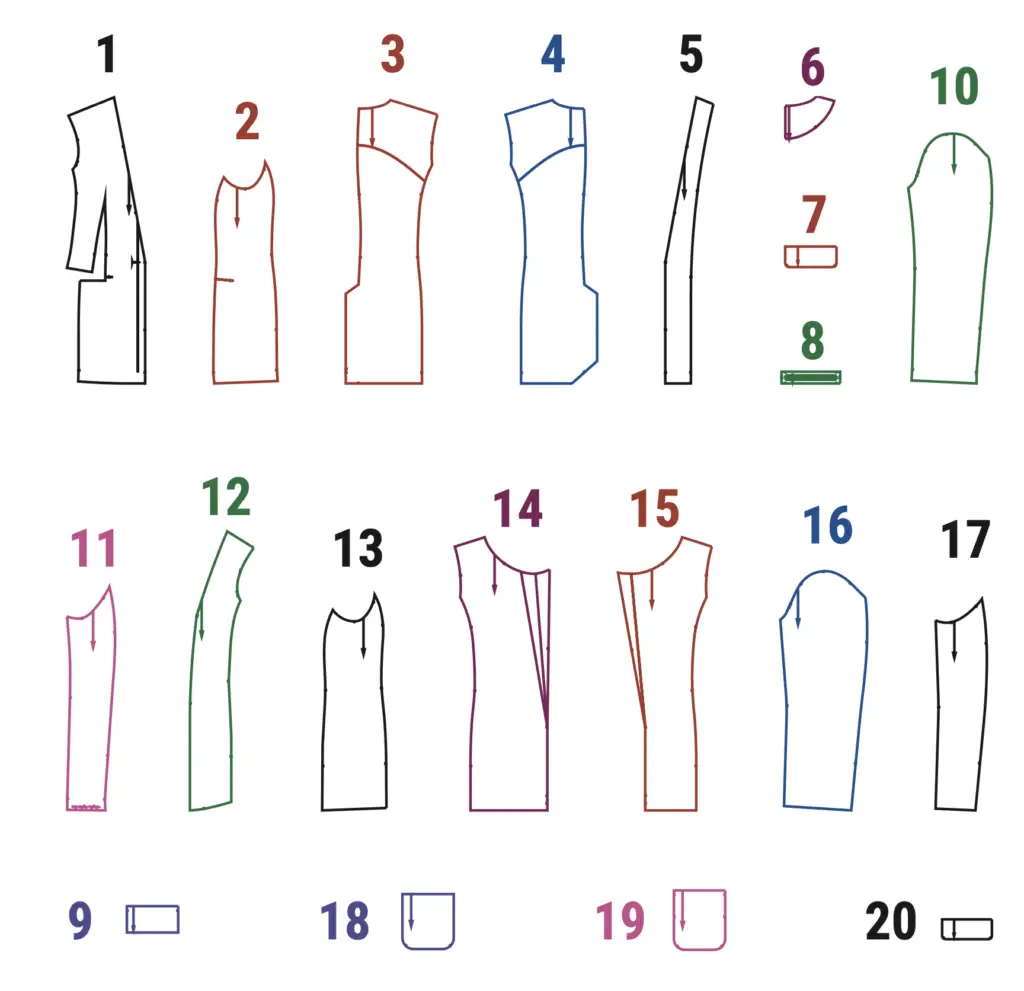
(№ – Name – Pieces’ quantity)
Main fabric:
1 – Front – 2 + Interfacing
2 – Side – 2 + Interfacing
3 – Back right – 1 + Interfacing partly
4 – Back left – 1 + Interfacing partly
5 – Front facing – 2 + Interfacing
6 – Folded back facing – 1 + Interfacing
7 – Flap – 2 + Interfacing
8 – Placket – 4 + Interfacing
9 – Pocket facing – 2
10 – Top sleeve – 2
11 – Under sleeve – 2
Lining
12 – Front lining – 2
13 – Side lining – 2
14 – Back lining right – 1
15 – Back lining left – 1
16 – Top sleeve – 2
17 – Under sleeve – 2
18 – Top pocket bag – 2
19 – Bottom pocket bag – 2
20 – Bottom flap – 2
• Chest ease — 18 cm (7 ⅛”);
• Waist ease — 28 cm (11″);
• Hips ease — 14 cm (5 ½”);
• Shoulder ease — 10 cm (4″).
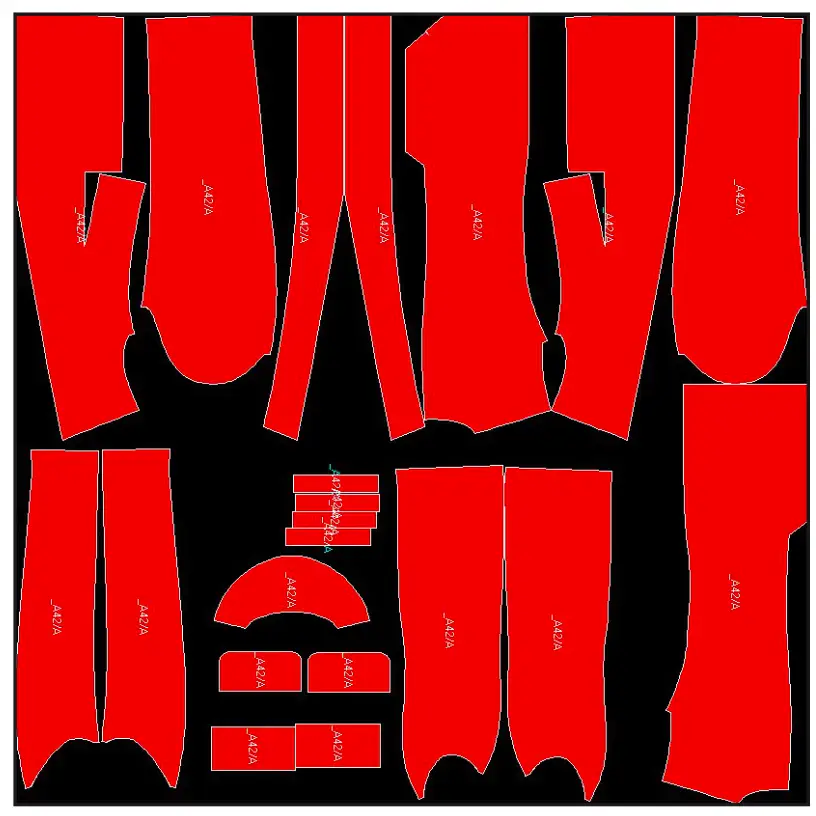
Front (1), side (2), front facing (5), back facing (6), flap (7), placket (8).
Partly interface: right back(3), left back (4).
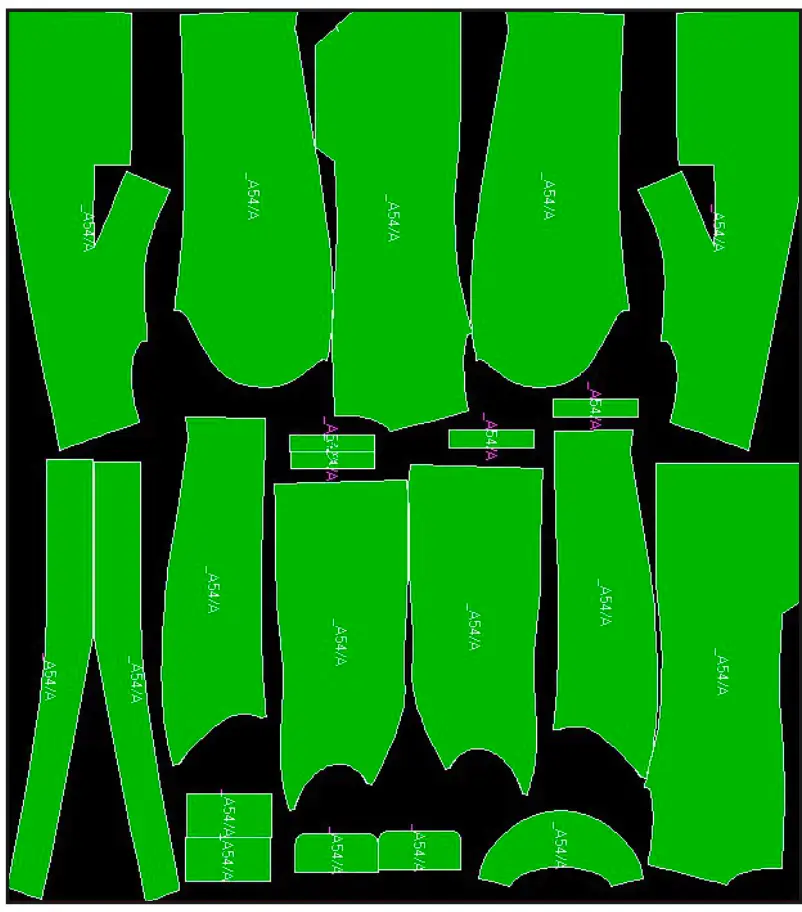
Width of fabric — 1.50 m (1 ⅝ yd)
Size — 34 (XXS)
Size — 48 (XXXL)
1. Pin the darts on the front parts (1) and sew them. Press the darts flat.
2. Place the pocket edge end-to-end, pin it or baste it. Pin and stitch the side piece (2). Press the seam allowance.
3. Interface the pocket location from the wrong side.
4. Mark the pocket location along the control points on the right side.
5. Press the pocket plackets (8) in half.
6. Place the flap (7) and bottom flap (20) with their right sides facing inward and stitch them at 0.7 cm (1/4’’) from the edge. Cut out the curves. Flip them onto the right side and press them.
7. Place the placket (8) on the bottom pocket bag (19) and stitch them together.
8. Overlock or zigzag the bottom edge of the pocket facing (9).
9. Stitch the pocket facing (9) onto the top pocket bag (18). Place the flap right on the pocket facing, then the placket (8) on the top of them, stitch everything together. 10. Place the bottom pocket bag with the placket down on the bottom marked line of the pocket, pin it and stitch it right into the stitching seam of the placket.
11. Place the top pocket bag on the marked top line of the pocket with the flap and placket down, pin and stitch into the seam.
12. Сheck the distance between the stitches on the wrong side. It should be equal to the width of the finished placket (1.2 cm / 3/8’’). Next, cut the entrance to the pocket in the center between the lines, not reaching the vertical line of 2 cm (3/4’’). Then trim the corners, not reaching the line by 0.5 cm (3/16’’).
13. Flip the parts to the wrong side. Secure the corners. Press them. Check the placket from the right side.
14. Sew the pocket lining and press the seam.
BACK
1. Interface the upper part of the back parts (3) and (4), as well as the allowances for the vent and the hem.
2. Press the vent allowance on the left back piece (4) onto the hem, leaving a seam width of 1 cm (3/8’’). Press the vent allowance on the right back piece (3) at 1 cm (3/8’’) from the edge.
3. Place the right sides of the back pieces facing each other. Pin them together, aligning the notches, and stitch them together, simultaneously moving to the vent. Press the seam allowance.
ASSEMBLING
1. Place the front pieces on the back pieces, right sides facing in. Pin them together and sew the shoulder and side cuts together. Press the seam allowances.
2. Reinforce the front facing pieces (5) along the neckline with fusible tape.
3. Stitch the back facing (6) to the front facings (5). Press the seams.
4. Place the facing with the right side down on the jacket and pin along the notches. Stitch it at 0.7 cm (1/4’’) from the edge. Topstitch at a distance of 0.2 cm (1/16’’) along the front facing and neck facing. Press the lapels, forming a 0.1 cm (1/16’’) edge from the jacket part.
SLEEVE
1. Place the top (10) and under sleeve (11) right sides inward, pin along the front edge and stitch them together. Press. Press the hem of the sleeve bottom.
2. Stitch the elbow cut. Press the seam flat.
3. Insert the sleeves into the armholes right sides together with the jacket, pin and sew in, evenly distributing the fit. Press the fit along the sleeve edge, without going beyond the stitching line with the iron. Direct the allowance towards the sleeve.
4. Sew the sleeve head roll to the sleeve cap. Place it on the sleeve side, align the notch on the sleeve cap, pin it and stitch it into the sleeve seam.
5. Place the shoulder pad on the shoulder seam, aligning the notch with the sleeve cap, and stitch at 0.2 cm (1/16’’) along the sleeve allowance. Then make another stitch to the sleeve seam.
6. Sew the shoulder seams of the jacket and the facing.
LINING
1. Place the lining sleeves (16) and (17) with the right sides facing inward and stitch the front edge, leaving an unstitched hole in the left sleeve. Press the seam allowance towards the top sleeve. Then stitch the elbow cut and press it towards the top sleeve.
2. Sew the side piece (13) of the lining to the parts of the front (12) of the lining. Press the seam onto the front.
3. Sew the lining of the right (14) and left (15) back along the middle seam until the notch for the vent. Stitch the folds along the notches at the bottom of the cut. Stitch the fold along the neckline. Press the seam allowance.
4. Sew shoulder and side seams in lining. Press the seam allowances towards the back.
5. Sew the sleeves into the armholes, matching the notches and evenly distributing the fit along the edge.
6. Place the lining right sides together with the jacket and pin along the edge of the lining. Sew them together.
7. Stitch the lining to the bottom of the sleeve at 1 cm (3/8’’) from the edge, secure along the seams.
8. Stitch the vent at 1 cm (3/8’’) from the edge, starting from the notch on the cut and ending with the fold at the bottom of the cut.
9. Stitch the bottom of the jacket at 1 cm (3/8’’) from the edge, securing the hem along all seams.
10. Flip out and iron the lining, sew up the unstitched hole.
11. Sew a buttonhole and sew on the button.
12. Give the jacket a final press.