

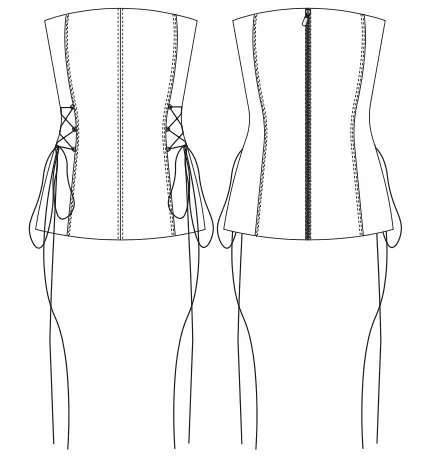
A spectacular bodice features lacing on the sides of the front, a metal zipper in the middle seam of the back. The bodice is lined.
We recommend using denim and cotton. It is better to use cotton fabric for lining.
• Metal separating zipper — 30 cm (11 ⅞);
• Interfacing — 15 cm (5 ⅞);
• Lace — 4.0 m (4 ⅜ yd);
• Cotton lining — 45 cm (17 ¾ in);
• Bias-cut fusible tape — 1.0 m (1 ⅛ yd).
Attention! Please account for shrinkage and buy 5-10% more than required.
|
International Size \ European size |
XXS-XS / 34-36 |
S-M / 38-40 |
L-XL / 42-44 |
2XL-3XL / 46-48 |
|---|---|---|---|---|
| Main fabric, m | 0,55 | 0,60 | 0,60 | 0,65 |
| Main fabric, yd | ⅝ | ⅝ | ⅝ | ¾ |
Pattern pieces already include seam allowances.
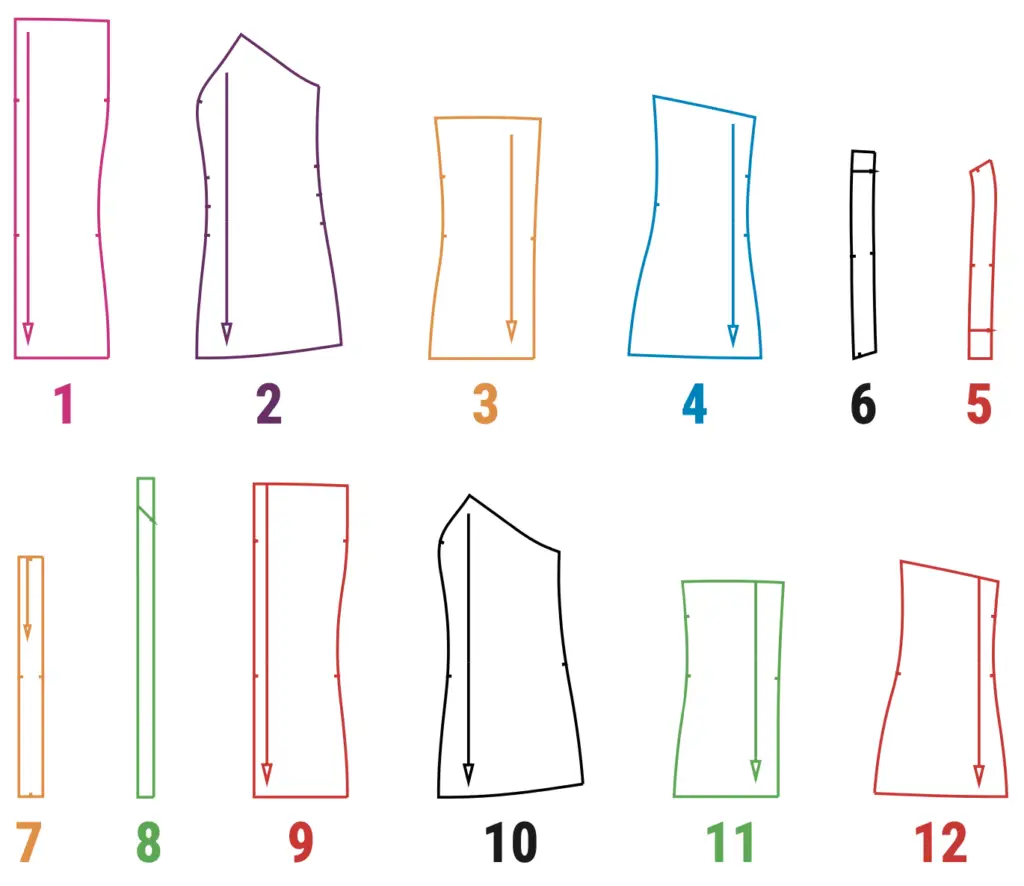
(№ – Name – Pieces’ quantity)
Main fabric:
1 – Front centre – 2
2 – Front side – 2
3 – Back centre – 2
4 – Back side – 2
5 – Front facing with a fold – 1 + Interfacing
6 – Back facing – 2 + Interfacing
7 – Zipper facing – 1
8 – Loops – 1
Lining
9 – Front centr – 2
10 – Front side – 2
11 – Back center – 2
12 – Back side – 2
• Chest ease — 3 cm (1 ⅛’’);
• Waist ease — 7 cm (2 ¼’’);
• Hips ease — 5 cm (2’’);
Front facing (5), back facing (6). Reinforce the facing of the front and back with fusible tape along the upper edge. Reinforce the bottom of the lining pieces (9), (10), (11), (12) with fusible tape. Interface the zipper allowances on the central parts of the back (3).
Width of fabric — 1.50 m (1 ⅝ yd)
Size — 34 (XXS)

Size — 48 (XXXL)

FRONT
1. Sew the central pieces of the front (1), folding the pieces right sides together. Press the allowances.
2. Topstitch on both sides of the seam.
3. Prepare the loops. Stitch the loop part (8) in half 0.5 cm (3/16’’) from the cut. If necessary, you can cut off the seam allowance and turn the piece right side out.
4. Cut the loops to a length suitable for the cord.
5. Sew the loops onto the front sides (2), placing them on the notches.
6. Sew the front sides to the center front pieces. Press the seam allowances and topstitch them.
BACK
1. Sew the central pieces of the back (3) with the sides of the back (4). Press seam allowances and topstitch them.
ZIPPER
1. Open the zipper and stitch first to one side of the middle cut of the back, equalizing the allowances. Then stitch the other side. Press.
2. Sew the zipper facing (7) along the short sides. Cut out corners and flip onto the right side.
3. Sew the zipper facing to the right side of the zipper. Press.
4. Sew the front and back bodice along the side seam, press the allowances to the back and topstitch.
5. Sew the front (5) and back (6) facings along the side seam, folding the pieces right sides together. Press the allowances.
LINING
1. Sew the center front lining pieces (9) along the middle seam. Press the allowances.
2. Attach the sides of the front lining (10) to the central pieces of the front. Press the allowances onto the lining.
3. Sew the central pieces of the back lining (11) with the sides of the back lining (12). Press the seam allowances towards the center.
4. Sew the lining along the side seams, leaving an unstitched opening in the left side seam. Press seam allowances to the back.
5. Pin the bottom edge of the facing to the top edge of the lining, stitch and press the seam allowances onto the lining.
6. Pin together the bodice and lining on all sides, aligning the notches. Stitch, cut out corners and flip onto the right side. Press seam allowances.
7. Topstitch along the zipper.
8. Sew up the unstitched opening.
9. Thread the laces through the loops.
10. Give the bodice a final press.