

PATTERN DESCRIPTION
This is a close-fitting bustier top with princess seams. Sleeves are set-in and have pleats. The top fastens with a center back open end zipper.
SUGGESTED MATERIALS
Crepe, satin, medium weight fabrics for dresses or suits. Jersey fabrics also can be used.
ALSO NEEDED
• Lining;
• Fusible tape for thickening edges for the zipper;
• Interfacing;
• Bias fusible tape for the neckline;
• 20 cm (7,87”) long open end zipper
| Size | XXS-XS | S-M | L-XL | XXL-XXXL |
|---|---|---|---|---|
| Main fabric (cm) | 75 | 75 | 90 | 95 |
| Lining (сm) | 45 | 47 | 50 | 50 |
| Main fabric (in) | 29,5 | 29,5 | 35,4 | 37,4 |
| Lining (in) | 17,7 | 18,5 | 19,7 | 19,7 |
Pattern pieces already include 1 cm (3.8”) seam allowances for all edges except hemallowance. Garment hem allowance is 2 cm (3.4”). You can elongate your top, but pay attention to the zipper’s length.
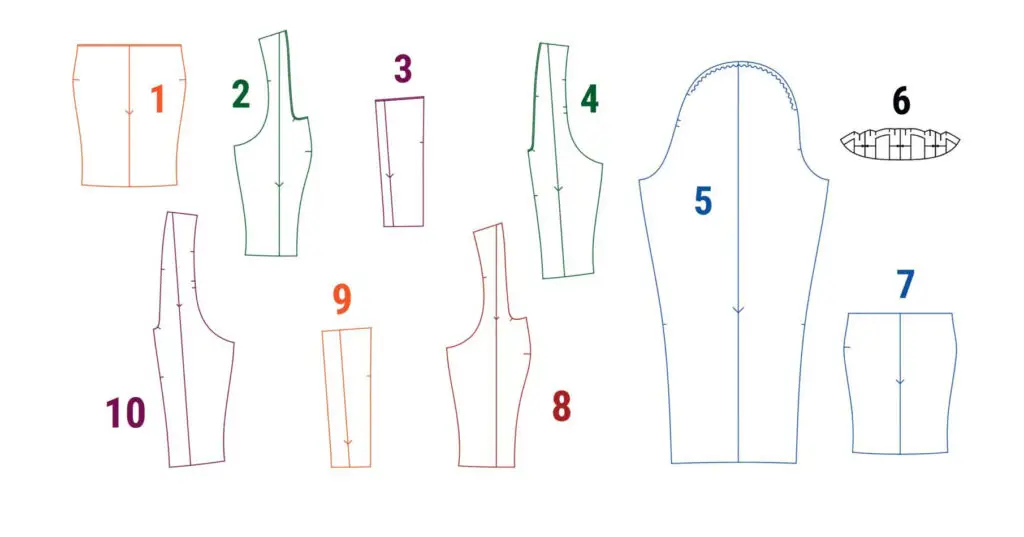
| Pattern piece | Quantity |
|---|---|
| Main fabric | |
| 1 - Front bodice | 1 |
| 2 - Front bodice side | 2 |
| 3 - Back bodice | 2 |
| 4 - Back bodice side | 2 |
| 5 - Sleeve | 2 |
| 6 - Sleeve head | 2 |
| Lining | |
| 7 - Front bodice lining | 1+ interfacing |
| 8 - Front bodice side lining | 2+ interfacing |
| 9 - Back bodice lining | 2+ interfacing |
| 10 - Back bodice side lining | 2+ interfacing |
INTERFACING
Fuse grain-reinforced bias tape to the lining’s neckline and armholes edges. Front bodice lining (7), front bodice side lining (8), back bodice lining (9), back bodice side lining (10).
Attention! We recommend to interface the top’s pieces for light non-jersey fabrics if you want to archive a bustier effect. If you use jersey or thicker fabric, interfacing of neckline is enough
SEWING INSTRUCTIONS
1. Pin the front bodice piece (1) and front bodice side pieces (2) right sides together. Stitch on the sewing machine and press seam allowances open.
2. Pin the back bodice piece (3) and back bodice side pieces (4) right sides together. Stitch on the sewing machine and press seam allowances open.
3. Stitch together shoulder seams and press open.
4. Stitch together side seams and press open.
LINING
1. Repeat the same actions as for pieces from the main fabric.
2. Pin the front bodice lining piece (7) and front bodice side lining pieces (8) right side together. Stitch on the sewing machine. Press seam allowances open.
3. Pin the back bodice lining piece (9) and back bodice side lining pieces (10) right sides together. Stitch on the sewing machine. Press seam allowances open.
4. Stitch together shoulder seams and side seams. Press.
5. Place the bodice outer layer and the lining right sides together. Align the edges. Stitch th neckline on the sewing machine. Seam allowance is 0.7 cm (0,3”).
6. Clip into rounding parts stopping 2 mm away from the seam line. Turn the right side out and understitch the seam allowances to the lining. Place the line of stitching 0.1 cm away from the original seam. Press.
7. Pin the lining to the top’s outer part right sides together. Align seams and edges. Sew lower edges together with 0.7 cm (0,3”) seam allowance
8. Turn the garment right side out and understitch the seam allowances to the lining. Place the line of stitching 0.1 cm (0,04) away from the original seam. Press.
ZIPPER
1. Turn the top wrong side out through the armhole.
2. Pin an open end zipper to the back’s central edges (the slider looks up). Stitch on the sewing machine. Turn the garment right side out. Press.
SLEEVES
1. Gather the sleeve cap (5) between the notches on the pattern.
2. Overlock the sleeve hem allowance and press it towards the wrong side.
3. Pin and stitch on the sewing machine the underarm seams. Press them towards the back. Finish the hemline with an invisible stitch.
4. With right sides facing together, place the sleeve into the armhole. Line up all the notches and pin into place at the underarm.
5. Baste aligning all the notches and distributing the gathers as evenly as possible. Stitch the sleeve into the armhole.
SLEEVE HEAD
1. Fold the sleeve head piece (6) in half, right side inside. Stitch together the short edges, turn the right side out and press flat. Make pleats and baste.
2. Attatch the sleeve head to the armhole, making the second line exactly where we stitched the sleeve.
3. Overlock the seam allowance and press from the wrong side.
4. Give the garment a final press.
Awesome! It is hard to make a bustier, but you achieved great result! What looks are you going for?
THE TOP IS READY