
The vest is lined. It has a fitted cut and features princess seams on the front and back.
We recommend medium-weight suit fabrics.
• Bias-cut fusible stay tape — 2.00 m (2 ¼ yd);
• Interfacing — 75 cm (29 ½”);
• Lining — 55 cm (21 ⅝”);
• Buttons — 3 pcs.

|
International Size \ European size |
XXS-XS / 34-36 |
S-M / 38-40 |
L-XL / 42-44 |
2XL-3XL / 46-48 |
|---|---|---|---|---|
| Main fabric, m | 1,00 | 1,10 | 1,10 | 1,15 |
| Main fabric, yd | 1 ⅛ | 1 ¼ | 1 ¼ | 1 ¼ |
When purchasing fabric, please account for shrinkage and buy 5—10% more than required.
Pattern pieces already include 1 cm (3/8″) seam allowances.
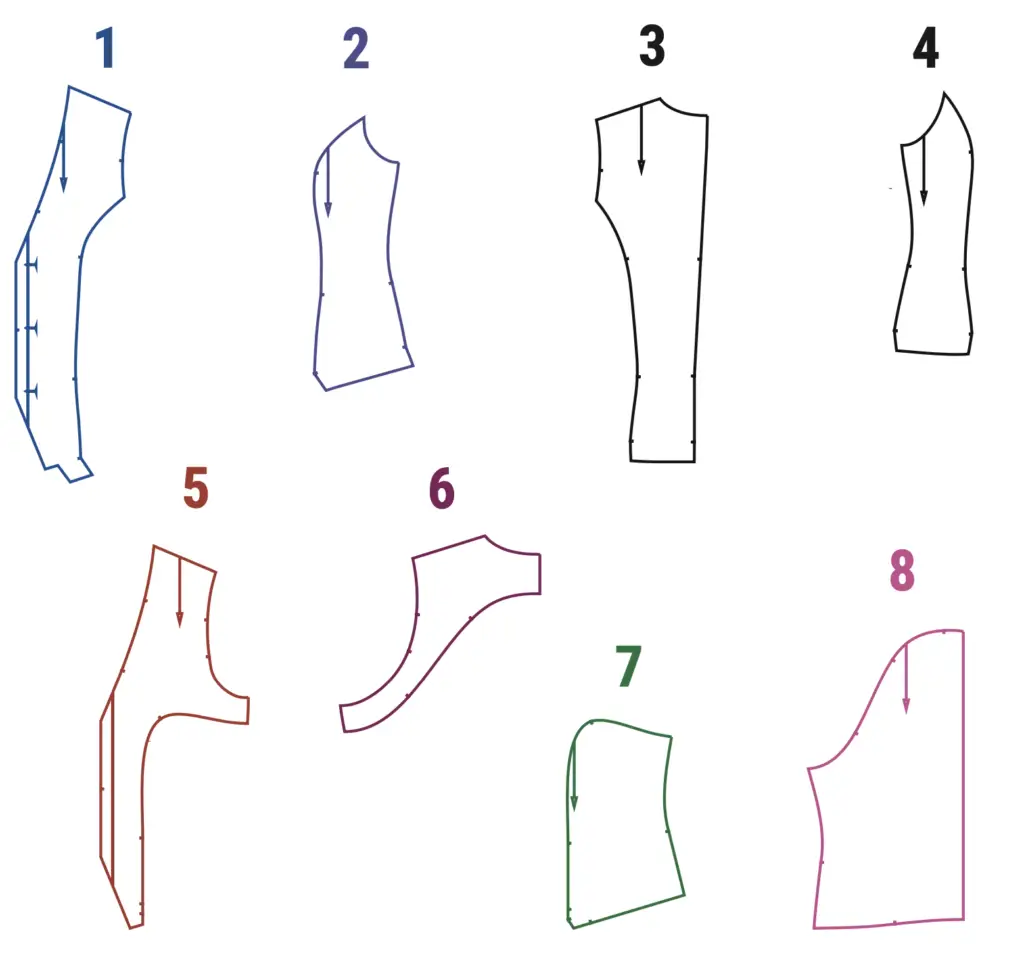
(№ – Name – Pieces’ quantity)
Main fabric:
1 – Front – 2 + Interfacing
2 – Front side – 2 + Interfacing
3 – Back – 2
4 – Back side – 2
5 – Front facing – 2 + Interfacing
6 – Folded back facing – 1 + Interfacing
Lining
7 – Front lining – 2
8 – Folded back lining – 1
• Chest ease — 6 cm (2 ⅜”);
• Waistline ease — 7 cm (2 ¼”);
• Hipline ease — 6 cm (2 ⅜”).
Front (1), front side (2), front facing (5), back facing (6). Interface the seam allowance along the bottom: back (3), back side (4). Bias-cut fusible stay tape: facing allowance and neck allowance, front shoulder cut.
Width of fabric — 1.50 m (1 ⅝ yd)
Size — 34 (XXS)

Size — 48 (XXXL)

PREPARING THE VEST
1. Place the front pieces (1) and the front side (2) face to face, pin and stitch. Press the seams.
2. Pin the central parts of the back (3) face to face and stitch. Press the seam.
3. Place the back sides (4) facing the central part of the back and stitch. Press the seam and press up in the area of the shoulder blades.
4. Press the hem on the front and back pieces.
5. Pin and stitch the shoulder and side seams. Press the allowances.
6. Sew the shoulder and side seams of the facing (5) and the back facing (6). Press the allowances.
LINING
1. Place the front lining pieces (7) face to face on the back (8) and stitch the side seams, leaving an unstitched hole in the left side seam.
2. Form a fold along the notches on the back of the lining. Iron the seam allowances towards the back.
3. Pin and stitch the lining to the facings, form a fold in the lining at the bottom of the front pieces. Press the seam allowance to the lining side.
4. Place the finished lining face to face with the vest, pin and stitch along the side and neck edges at 0.7 cm (1/4’’) from the edge.
5. Topstitch at 0.2 cm (1/16’’) from the seam along the hem and facing of the neckline. Press the sides, making a 0.1 cm (1/16’’) edge from the main parts.
6. Flip the armholes wrong side out and place them face to face, matching the seams and notches. Pin and overstitch in a circle, starting from the shoulder seam at 0.7 cm (1/4’’) from the edge. Cut in areas where the curves are and topstitch at 0.2 cm (1/16’’) along the facings, starting from the shoulder seam. Press the armholes, making a 0.1 cm (1/16’’) edge from the main fabric.
7. Stitch the bottom of the vest with lining, secure the bottom hem along all seams.
8. Flip the vest right side out and sew up the unstitched hole. Press the lining along the bottom of the vest.
9. Stitch the buttonholes and sew the buttons.
10. Give the vest a final press.