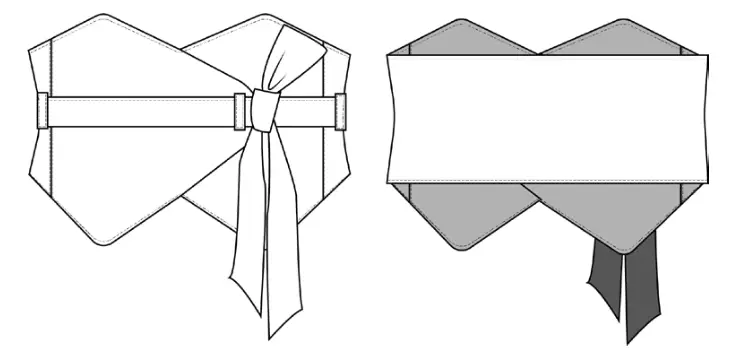
Sofia women's obi belt - sewing tutorial

PATTERN DESCRIPTION
It’s a kind of obi belt. It fastens with snap buttons. Recommended to wear on the dresses, blouses or tops to accentuate the waist.
SUGGESTED MATERIALS
Any materials that keep their shape well. Leather and suede are perfect.
ALSO NEEDED
• Snap buttons — 2 pcs;
• Lining — 0,35 m, ⅜ yd.

FABRIC REQUIREMENT (CM/IN)
for fabric width 1.50 m (1 ⅝ yd)
Attention! Please account for shrinkage and buy 5-10% more than required.
|
International Size \ European size |
XXS-XS / 34-36 |
S-M / 38-40 |
L-XL / 42-44 |
2XL-3XL / 46-48 |
|---|---|---|---|---|
| Main fabric, m | 0,50 | 0,50 | 0,55 | 0,55 |
| Main fabric, yd | ½ | ½ | ⅝ | ⅝ |
SEAM ALLOWANCES
Seam allowances for stitching the pieces are 1 cm (3/8”).
SPECIFICATIONS
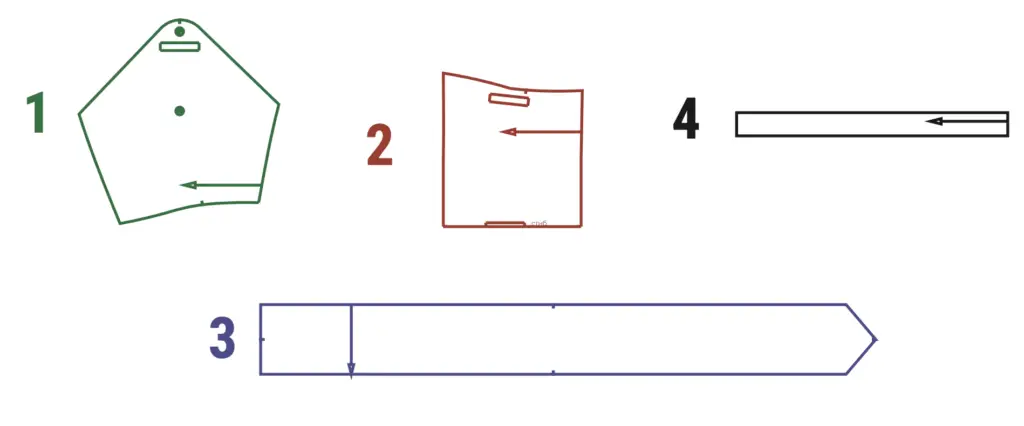
(№ – Name – Pieces’ quantity)
Main fabric:
1 – Front – 2 + Interfacing
2 – Back – 1 + Interfacing
3 – Belt (a) – 2 + Interfacing
4 – Belt (b) – 2 + Interfacing
5 – Belt loops – 1
Lining
1 – Front – 2
2 – Back – 1
DETAILS TO INTERFACE
Front (1), back (2), belt (3).
PATTERN PIECES

SEWING INSTRUCTIONS
1. Place the front pieces (1) right side down on the back (2) and stitch.
2. Place the seam allowances open and make top stitches on the right side of the front piece 0,2 cm (1/8”) from the previous seam on the left and the right parts .
3. Place the front lining pieces (1) right side down on the back (2) and stitch.
4. Leave an unstitched opening in the left side seam for turning the belt inside out. Press the seams.
5. Sew the belt loop (4) . Use a 0,5 cm (just under 1/4”) stitch length and turn it onto the right side. Press and make top stitches 0,2 cm (1/8”) from the folds. Cut the belt loops to the desired length.
6. Place the belt parts right sides together and stitch along the middle edge. Place the seam allowances open and make top stitches on the right side of the piece 0,2 cm (1/8”) from the previous seam.
7. Place the belt right side down and sew it. Use a 0,7 cm (1/4”) stitch length leaving an unstitched opening for further turning inside out.
8. Turn it right side out, press it and make a top stitch 0,5 cm (just under 1/4”) along the belt.
9. Place the upper part of the main fabric belt and the lining right sides together and sew in a circle. Use a 0,7 cm (1/4”) stitch length.
10. Trim the curves, corners, turn it onto the right side and press. Make a top stitch 0,5 cm (just under 1/4”) around the perimeter of the part.
11. Sew up the unstitched opening.
12. Place the belt loops along the markings on the upper belt and stitch.
13. Sew snap buttons following the markings on the patterns.
14. Pull the belt into the loops.
15. The belt is done!
